Alcuni degli Biscotti al cioccolato con impronta di pollice are delicious Christmas cookies with a dough made with Ingredienti 5 and filled with a jam and white chocolate filling. They are egg-free, dairy-free, but not taste-free!

I love the Christmas season for one thing: cookies. I’m a huge fan of making many different kinds of them, like Christmas Wreath Cookies, Biscotti allo zucchero salutari, o Biscotti di mandorle a forma di palla di neve. While I have already made several types of thumbprint cookies, like my Biscotti al cioccolato e mandorle con impronta di pollice, my kids asked me to make a different version with jam and white chocolate inside. Challenge accepted!
Anche se la ricetta completa si trova qui sotto, non perderti tutti i miei consigli più in basso, tra cui suggerimenti su come sostituire gli ingredienti, consigli di cucina e foto passo passo!
Ti piace questa ricetta?
Lascia un commento di seguito o vai al nostro pagina Facebook dove rispondo a (quasi) tutti i commenti, il nostro pagina Instagram per ispirazione o il nostro Pinterest per salvare le ricette!

Biscotti al cioccolato con impronta di pollice
Ingredienti
- 1 bicchiere Burro senza lattosio (non salato) - softened, note 1
- 2 tazza Farina per tutti gli usi - note 2
- ½ bicchiere Cacao in polvere non zuccherato
- ¼ bicchiere Latte di mandorla - note 3
- ¾ bicchiere Zucchero a velo
Ripieno
- ⅓ bicchiere Gocce Di Cioccolato Bianco
- 6-8 cucchiai Marmellata di lamponi
Istruzioni
- Line two large baking sheets with parchment paper. Lightly oil paper with cooking oil spray and set aside.
- In a mixing bowl, stir the softened butter and powdered sugar until creamy and smooth. You can use a rubber spatula, or the dough hook of your stand mixer.
- Add unsweetened cocoa powder, flour, and milk and stir again to incorporate. When it starts to look crumbly, slightly oil your hands and knead and squeeze the dough until it comes together into a smooth, soft and consistent cookie dough.
- Divide the dough into 32 balls of same size and place on the prepared baking sheets, leaving a thumb of space between each.
- Refrigerate the baking sheets with the cookie dough balls on it for 30 minutes.
- Remove from the fridge and preheat the oven to 350 °F (180 °C).
- Use the back of a 1/2 teaspoon measuring spoon to press a print in the center of each cookie dough ball.
- Bake the cookies for 14 minutes at 350 °F (180 °C). Let them cool down on the cookie sheets for 5 minutes. If the thumbprint fades, press them again gently with the same tool as before to make sure the center of each cookie has a deep center to fill later on.
- Transfer to a cooling rack and cool completely before filling.
- When the cookies are cold, melt the white chocolate in a microwave-safe bowl in 30-second bursts, stir and repeat until fully melted and shiny.
- Fill each cookie cavity with 1/2 teaspoon of jam, then cover it up with melted white chocolate to seal the thumbprint.
- Refrigerate the cookies for an hour to set the chocolate shell.
Note
Alimentazione
Ingredienti e sostituzioni
You only need 5 ingredients to make the dough and then can use any fillings you like.
- Burro senza latticini – This creates a soft, rich dough. Margarine or regular butter can be substituted if you’re not dairy-free. Ensure it’s softened for easy mixing.
- Farina XNUMX – Other flours like oat or almond flour aren’t recommended, as they’ll alter the texture. For a gluten-free version, use my guida alla conversione senza glutine.
- Cacao in polvere non zuccherato – This adds a deep chocolate flavor. Use high-quality cocoa powder for the best taste.
- Latte di mandorla – Keeps the dough soft and pliable. Any plant-based milk or regular milk works equally well.
- Zucchero a velo – Provides sweetness and ensures a smooth texture.
How to Make Chocolate Thumbprint Cookies
For those of you who like pictures, I’ve included below photos of all key steps.

Combine the dairy-free butter with the powdered sugar to make the base.

Add the flour and cocoa powder to the butter mixture and incorporate the almond milk.

Form a large dough log and place it on your benchtop.

Cut four large strips of dough with a kitchen knife.

Divide each strip in 8 equal portions to make a total of 32 dough portions.

Roll the dough into small balls and place them on a baking sheet.

Space them out and place the sheet in the fridge for 30 minutes.
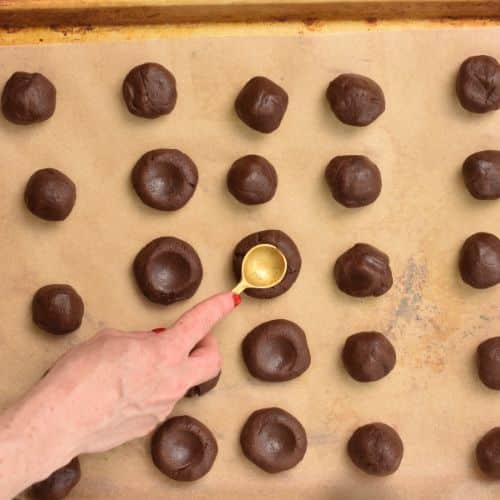
Press each of them with the back of a measuring spoon and bake them for 14 minutes at 350 °F (180 °C).
Decorating the Cookies
I decorated my thumbprint cookies by filling them with jam and a layer of melted dairy-free white chocolate on top, but you can go crazy with any filling you like and even top them with more decorations. Here are my favorite options.
- Guscio di cioccolato: Fill the thumbprints halfway with jam before covering with melted white chocolate for a layered effect. You can also use dark chocolate.
- Creative Fillings: Replace the jam with nut butter, date caramel, or a thickened fruit compote for variety.
- Toppings: Sprinkle crushed nuts, coconut flakes, Christmas sprinkles, or edible glitter on the melted chocolate for a touch of extra fanciness.
I consigli di Carine per la pasticceria
While these cookies are quite easy to do, I have a few more tips to make sure they’re perfect every time.
- Raffreddare l'impasto – Refrigerating the dough balls prevents them from spreading too much during baking and helps maintain the thumbprint shape.
- Perfect Thumbprints – Use the back of a 1/2 teaspoon measuring spoon for consistent, neat prints. Repress the thumbprint after baking if needed while the cookies are still warm.
- Even-Sized Cookies – Roll the dough into balls of uniform size to ensure even baking. Using a cookie scoop can help.
- Non cuocere troppo – The cookies should be firm but not dry. Overbaking can make them crumbly.
- Smooth White Chocolate – Melt chocolate in short bursts in the microwave to avoid burning, and stir in between for a glossy, smooth finish.
- Layer the Filling – Add a small amount of jam first to anchor the flavors, then seal with white chocolate for a beautiful and delicious result.
Archiviazione
Store the cookies in an airtight container in the fridge for up to one week. Keep in mind that they soften slightly over time.


Great take on classic thumbprint cookies. Super delish!