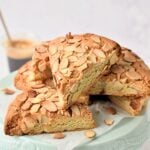
Disse Gresskarscones are easy, healthier pumpkin scones made with wholesome ingredients, no eggs, no butter, and dairy-free. They are delicious served with a maple glaze.

I love baking with pumpkin. Not only does it add a delicious taste to these scones, but it also makes the whole house smell like Autumn. These are the reasons why I go nuts with pumpkin, like I did with my Gresskar-banankake, Sunne gresskarhavregrøtkakerog Gresskarbiter.
These (American) scones are super easy to make and are the perfect breakfast to celebrate fall.
Selv om hele oppskriften er rett nedenfor, bør du ikke gå glipp av alle tipsene mine lenger ned, inkludert ingrediensbytter, matlagingstips og trinnvise bilder!
Liker du denne oppskriften?
Legg igjen en kommentere nedenfor eller gå til vår Facebook-side der jeg svarer på (nesten) alle kommentarer, vår Instagram-side for inspirasjon, eller vår Pinterest for å lagre oppskrifter!

Gresskarscones
Ingredienser
- 2 kopper Selvhevende mel - (merknad 1)
- ½ cup Gresskarpuré - cold from the fridge (note 2)
- ½ cup Kokoskrem - cold from the fridge (note 3)
- 2 ss Olivenolje med mild smak - (merknad 4)
Valgfritt – anbefalt for smaker
- 2 ts Gresskarpai-krydder
- ¼ cup Brunt sukker - recommended if you don't glaze the scones
Maple Glazing
- ¼ cup Lønnesirup
- ½ cup Melis
Instruksjoner
- Forvarm ovnen til 200 °C. Kle en stor stekeplate med bakepapir. Smør papiret lett med matoljespray. Sett til side.
- In a large mixing bowl, add self-rising flour, pumpkin puree, cream, olive oil, pumpkin pie spices, and sugar – if used.
- Stir with a fork, then use your fingers to rub the ingredients together and form a smooth dough. If it's too sticky, add a little more flour. If it's too dry, add a little more cream to bring together.
- Plasser deigballen foran deg, trykk den flat ut, og rull den deretter til en 8 cm skive med en kjevle.
- Use a knife to cut the disc into 8 equal triangles.
- Place the scones on the prepared baking sheet two thumbs apart so they don't touch each other.
- If you like, brush a bit of cream on top before baking.
- Bake the scones for 20 minutes in the center rack of the oven at 400 °F (200 °C) until golden brown and crispy on the edges and top.
- Cool down on a cooling rack at room temperature before glazing.
- In a small mixing bowl, stir the icing sugar and maple syrup until creamy and smooth.
- Drizzle the icing on top of the cooled scones.
Merknader
Ernæring
Ingredienser og erstatninger
- Selvhevende mel – Choose a high-quality self-rising flour for best results. For a homemade version, mix all-purpose flour with baking powder as per the notes in the recipe card. For a gluten-free option, use my glutenfri omformer, men ikke glem bakepulveret.
- Gresskarpuré – Use pure pumpkin puree, not pumpkin pie filling. Homemade puree works well too. For variety, try butternut squash or baby boo puree.
- Kokoskrem – I prefer full-fat coconut cream for richness. Alternatives include soy cream or rice cream for different flavor profiles.
- Lett olivenolje – Choose a light olive oil for its neutral flavor. Other options include melted coconut oil or sunflower oil. I don’t think it would work well with oil replacers like applesauce.
- Gresskarpai-krydder – Use a premade blend or create your own with cinnamon, nutmeg, ginger, and cloves.
How to Make Pumpkin Scones
This is an easy recipe to make with the recipe card further down but I’ve included below pictures of key steps.

Place all the ingredients in a mixing bowl.

Stir with a fork initially before using your hands to combine the dough.

Form a large, uniform dough ball that isn’t sticky.

Place the dough ball on a baking dish lined with parchment paper and flatten it into a thick disc.

Cut the dough disc into eight equal triangles.

Bake the pumpkin scones at 400 °F (200 °C) for 20 minutes.
Carines baketips
Beyond what I’ve written in the recipe card, I’ve included below some more tips to make the best scones!
- Kalde ingredienser – Keep the pumpkin puree and cream cold for flakier scones.
- Minimal Mixing – Handle the dough as little as possible to avoid tough scones.
- Proper Shaping – Roll the dough to an even thickness for uniform baking. If some parts are thicker, they might not be baked.
- Skjæreteknikk – Use a sharp knife for clean cuts, pressing straight down without sawing. Or even better, use a cake slicer like in the picture above.
- Mellomrom – Leave enough space between scones on the baking sheet for even browning.
- Børsting – For a golden top, brush with a little plant-based milk before baking.
- Nedkjøling – Allow the scones to cool completely before glazing to prevent the glaze from melting.
- Glaze Consistency – Adjust the glaze thickness by adding more icing sugar or maple syrup as needed.


Loved it! easy to use it
I’m not using plant based diet but will use the recipe as written with non plant based ingredients. Looks wonderful. Also LOVE the picture of you and your spouse. Thank you for sharing.
Thank you Beth!!
Dette fungerte akkurat som skrevet, takk!