Te Czekoladowe ciasteczka z odciskami palców are delicious Christmas cookies with a dough made with Składniki 5 and filled with a jam and white chocolate filling. They are egg-free, dairy-free, but not taste-free!

I love the Christmas season for one thing: cookies. I’m a huge fan of making many different kinds of them, like Ciasteczka w kształcie wieńca świątecznego, Zdrowe ciasteczka cukrowelub Ciasteczka migdałowe w kształcie śnieżek. While I have already made several types of thumbprint cookies, like my Ciasteczka czekoladowo-migdałowe z odciskiem kciuka, my kids asked me to make a different version with jam and white chocolate inside. Challenge accepted!
Chociaż cały przepis znajdziesz poniżej, nie przegap wszystkich moich wskazówek zamieszczonych niżej, w tym wskazówek dotyczących zamiany składników, porad kulinarnych i zdjęć krok po kroku!
Podoba Ci się ten przepis?
Zostaw komentarz poniżej lub przejdź do naszego Facebook strona gdzie odpowiadam na (prawie) wszystkie komentarze, nasze strona Instagram dla inspiracji lub naszego Pinterest do zapisywania przepisów!

Czekoladowe ciasteczka z odciskami palców
Skład
- 1 kubek Masło bezmleczne (niesolone) - softened, note 1
- 2 kubki Mąka uniwersalna - Zauważa 2
- ½ kubek Niesłodzony proszek kakaowy
- ¼ kubek Mleko migdałowe - Zauważa 3
- ¾ kubek Cukier puder
Wypełnienie
- ⅓ kubek Chipsy z białej czekolady
- 6-8 łyżka stołowa Dżem malinowy
Instrukcje
- Line two large baking sheets with parchment paper. Lightly oil paper with cooking oil spray and set aside.
- In a mixing bowl, stir the softened butter and powdered sugar until creamy and smooth. You can use a rubber spatula, or the dough hook of your stand mixer.
- Add unsweetened cocoa powder, flour, and milk and stir again to incorporate. When it starts to look crumbly, slightly oil your hands and knead and squeeze the dough until it comes together into a smooth, soft and consistent cookie dough.
- Divide the dough into 32 balls of same size and place on the prepared baking sheets, leaving a thumb of space between each.
- Refrigerate the baking sheets with the cookie dough balls on it for 30 minutes.
- Remove from the fridge and preheat the oven to 350 °F (180 °C).
- Use the back of a 1/2 teaspoon measuring spoon to press a print in the center of each cookie dough ball.
- Bake the cookies for 14 minutes at 350 °F (180 °C). Let them cool down on the cookie sheets for 5 minutes. If the thumbprint fades, press them again gently with the same tool as before to make sure the center of each cookie has a deep center to fill later on.
- Transfer to a cooling rack and cool completely before filling.
- When the cookies are cold, melt the white chocolate in a microwave-safe bowl in 30-second bursts, stir and repeat until fully melted and shiny.
- Fill each cookie cavity with 1/2 teaspoon of jam, then cover it up with melted white chocolate to seal the thumbprint.
- Refrigerate the cookies for an hour to set the chocolate shell.
Komentarz
Odżywianie
Składniki i zamienniki
You only need 5 ingredients to make the dough and then can use any fillings you like.
- Masło bezmleczne – This creates a soft, rich dough. Margarine or regular butter can be substituted if you’re not dairy-free. Ensure it’s softened for easy mixing.
- Mąka uniwersalna – Other flours like oat or almond flour aren’t recommended, as they’ll alter the texture. For a gluten-free version, use my przewodnik po przejściu na dietę bezglutenową.
- Niesłodzony proszek kakaowy – This adds a deep chocolate flavor. Use high-quality cocoa powder for the best taste.
- Mleko migdałowe – Keeps the dough soft and pliable. Any plant-based milk or regular milk works equally well.
- Cukier puder – Provides sweetness and ensures a smooth texture.
How to Make Chocolate Thumbprint Cookies
For those of you who like pictures, I’ve included below photos of all key steps.

Combine the dairy-free butter with the powdered sugar to make the base.

Add the flour and cocoa powder to the butter mixture and incorporate the almond milk.

Form a large dough log and place it on your benchtop.

Cut four large strips of dough with a kitchen knife.

Divide each strip in 8 equal portions to make a total of 32 dough portions.

Roll the dough into small balls and place them on a baking sheet.

Space them out and place the sheet in the fridge for 30 minutes.
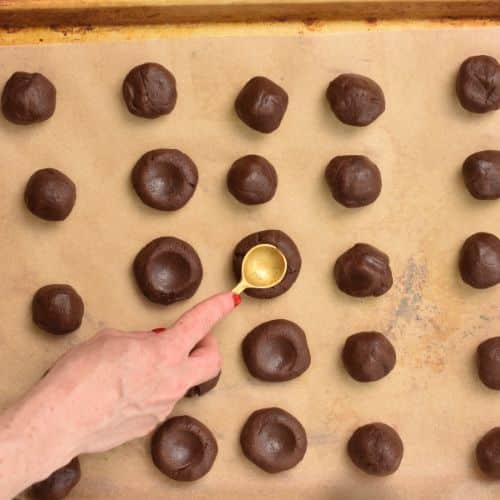
Press each of them with the back of a measuring spoon and bake them for 14 minutes at 350 °F (180 °C).
Decorating the Cookies
I decorated my thumbprint cookies by filling them with jam and a layer of melted dairy-free white chocolate on top, but you can go crazy with any filling you like and even top them with more decorations. Here are my favorite options.
- Czekoladowa skorupka: Fill the thumbprints halfway with jam before covering with melted white chocolate for a layered effect. You can also use dark chocolate.
- Creative Fillings: Replace the jam with nut butter, karmel daktylowy, or a thickened fruit compote for variety.
- Polewy: Sprinkle crushed nuts, coconut flakes, Christmas sprinkles, or edible glitter on the melted chocolate for a touch of extra fanciness.
Porady Carine dotyczące pieczenia
While these cookies are quite easy to do, I have a few more tips to make sure they’re perfect every time.
- Schłodź ciasto – Refrigerating the dough balls prevents them from spreading too much during baking and helps maintain the thumbprint shape.
- Perfect Thumbprints – Use the back of a 1/2 teaspoon measuring spoon for consistent, neat prints. Repress the thumbprint after baking if needed while the cookies are still warm.
- Even-Sized Cookies – Roll the dough into balls of uniform size to ensure even baking. Using a cookie scoop can help.
- Nie przepiekaj – The cookies should be firm but not dry. Overbaking can make them crumbly.
- Smooth White Chocolate – Melt chocolate in short bursts in the microwave to avoid burning, and stir in between for a glossy, smooth finish.
- Layer the Filling – Add a small amount of jam first to anchor the flavors, then seal with white chocolate for a beautiful and delicious result.
Dyski
Store the cookies in an airtight container in the fridge do jednego tygodnia. Keep in mind that they soften slightly over time.


Great take on classic thumbprint cookies. Super delish!