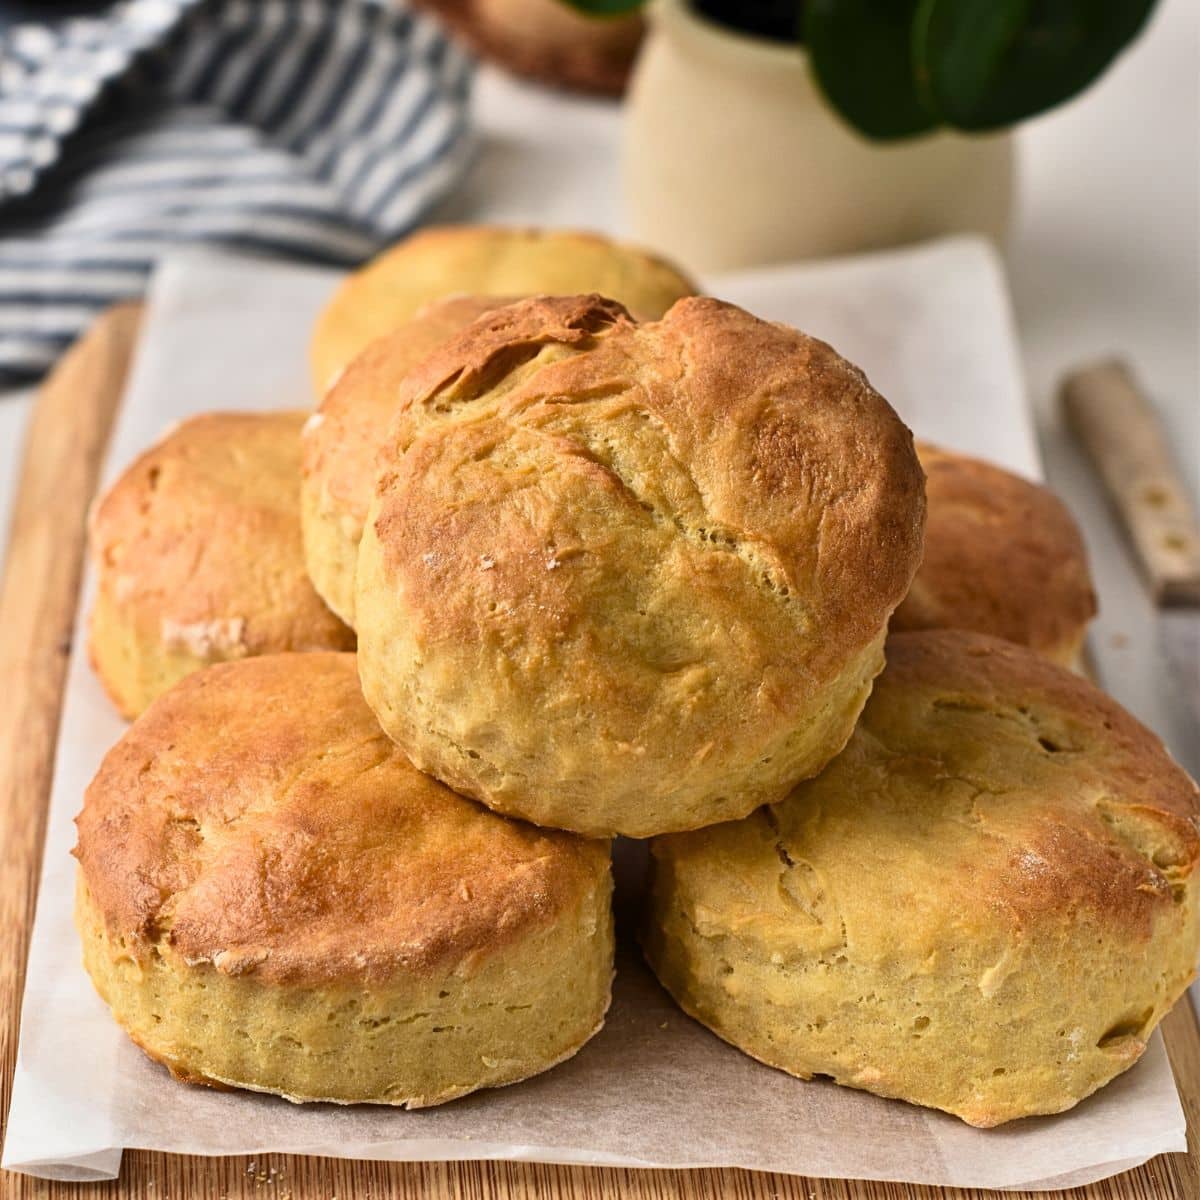
These Protein Scones are simple tofu-based British scones made with just 3 ingredients, no eggs and no dairy, and full of 11 grams of protein.
While the whole recipe is just below, don’t miss all my tips further down, including ingredient swaps, my cooking tips, and step-by-step shots!
Like This Recipe?
Leave a comment below or head to our Facebook page where I reply to (almost) all comments, our Instagram page for inspiration, or our Pinterest for saving recipes!

Protein Scones
Ingredients
- 2 cups Self-Rising Flour - (note 1)
- 1 block Firm Tofu - (11oz / 300g) (note 2)
- ¾ cup Water - (note 3)
- ½ teaspoon Salt - optional
Instructions
- Open the tofu packaging, discard the water it's stored in. Pat the tofu dry with absorbent paper. You don't need to press it for this recipe.
- Roughly cut the tofu into pieces and place them in a food processor or high-speed blender. Add the pieces of tofu with water or soy milk for more protein.
- Blend/process until it forms a creamy, smooth tofu paste. You may have to use a rubber spatula to scrape down the side of the jug/bowl a few times, and repeat blending until everything is nicely blended.
- In a large mixing bowl, add self-rising flour and salt. Stir to combine.
- Measure 2 1/2 cups of tofu paste made earlier, and add this to the bowl with the flour. If you end up with too much tofu paste, store it in the fridge in an airtight container for up to 3 days. Then, use this in pasta sauce, smoothies, or curries.
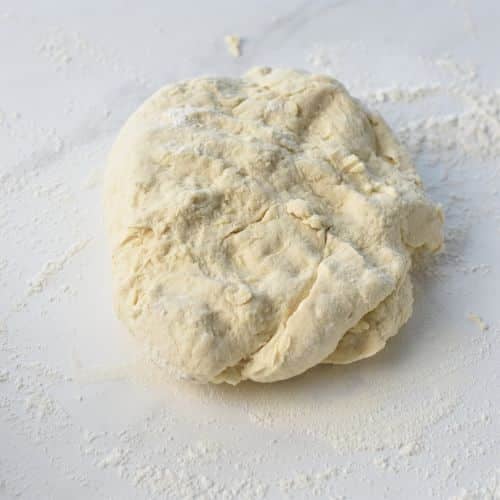
- Stir the flour/tofu mixture with a rubber spoon at first, it forms lumps when mixed with flour. Stop, grease your hands, and knead and squeeze to bring the ingredients together. It's sticky and a bit messy, but it comes together into a dough ball as you knead.
- If too sticky, add more flour to bring the dough together. The dough should stay soft, moist, but not stick to your hands.
- If preferred, use the paddle attachment of a stand mixer. Knead the dough on low speed (speed 2-3 of a KitchenAid stand mixer), until it forms a dough ball. It will be sticky, that's normal. Transfer to a floured surface, and knead, adding more flour if needed as mentioned in the step above.
- Preheat the oven to 400°F (200°C). Line a large baking sheet with parchment paper. Lightly oil the paper with cooking oil spray. Set aside.
- Flour your work surface, add the dough, and roll it into about 2 cm/ 0.8 inches in thickness.
- Use a scone cutter to cut out scones from the dough. Use leftover dough on the sides to reform a dough ball, roll again, and cut out more scones. I made 6 large scones (8cm/3.1 inches each).
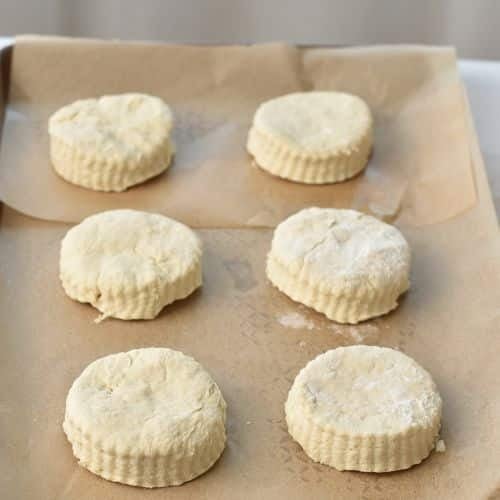
- Place the scones on the prepared pan, leaving 2 inches apart as they expand in the oven.
- Bake the scones for 17-19 minutes at 400°F (200°C) on the middle rack of the oven until the top gets nicely golden brown and a toothpick inserted in one of the scones comes out clean.
- Cool down on a cooling rack for 1 hour before serving.
Notes
Nutrition
Ingredients and Substitutions
You only need 2 ingredients to make this recipe (excluding water you can get from the tap and the optional salt). Here’s how to pick them.
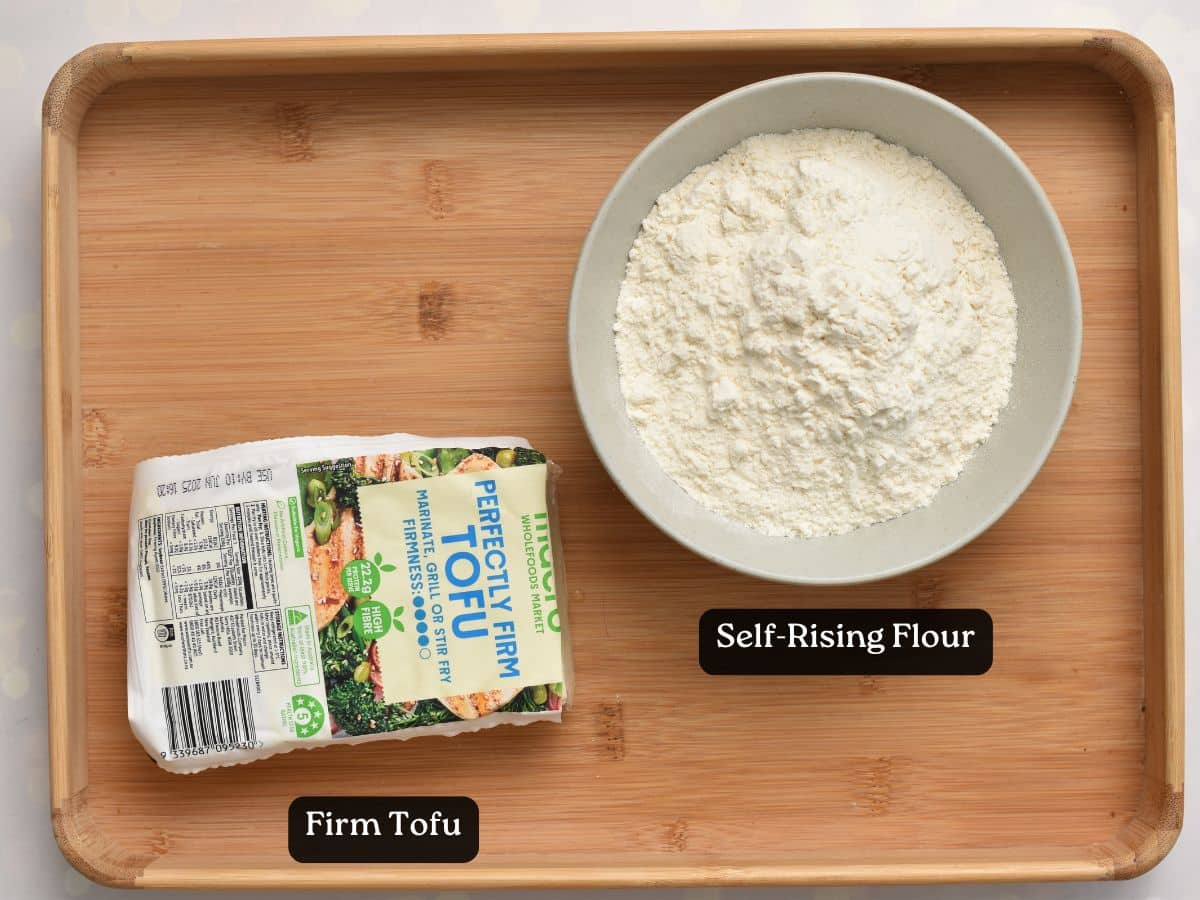
- Self-Rising Flour – This provides the main structure and lift for the scones. You can also use all-purpose flour by whisking in baking powder (quantities for this in the recipe card). For a gluten-free option, use my gluten-free converter, but don’t forget the baking powder.
- Firm Tofu – This is the protein source and creates the unique texture of these scones. It is important to use firm tofu, not silken tofu, as silken tofu has a much higher moisture content and will make a gummy and chewy result.
- Water – This helps create a smooth tofu paste and brings the dough together. Soy milk can also be used for an added protein boost.
How to Make Protein Scones
This recipe is super easy to whip up. Here’s how in a few pictures.
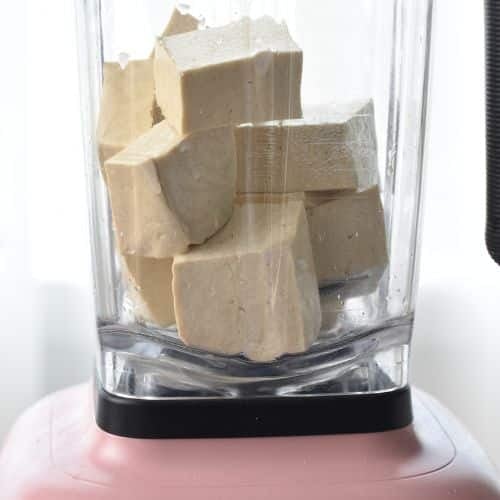
Roughly cut the tofu so it fits into your blender and top with the water.

Blend the tofu until it makes a smooth mixture that can be poured.
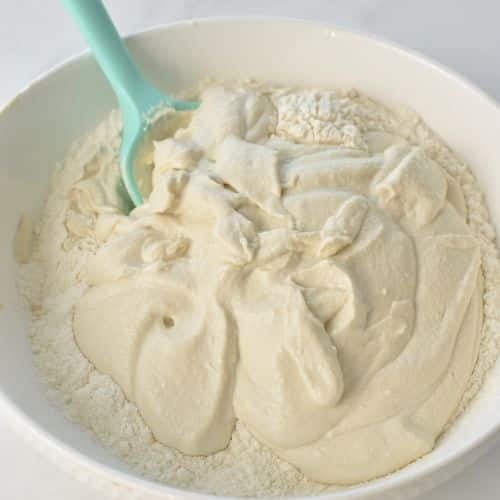
Combine the dry ingredients in a bowl and add the blended tofu.
Form a large dough ball and start cutting scones with a scone cutter.
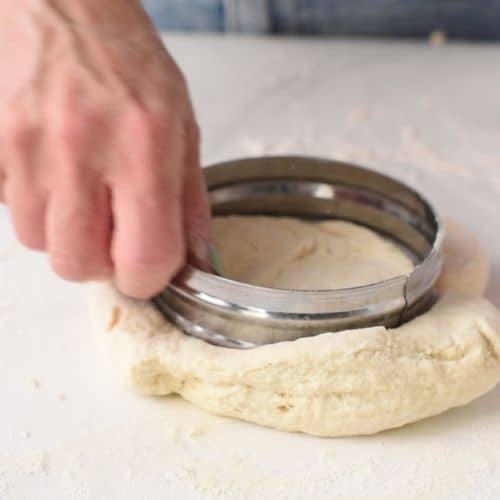
Re-roll the leftovers and cut more scones until no more dough is left.
Bake the scones for 17-19 minutes at 400°F (200°C).
Carine’s Baking Tips
Let me share a few more tips for great scones.
- Tofu Type is Crucial – Use firm tofu, not silken tofu. Silken tofu has a completely different moisture content and protein level, and it will not work for this recipe’s ratios.
- Accurate Tofu Measurement – The key to success in this recipe is accurately measuring the blended tofu cream. You can blend the tofu with water, or for more protein, use soy milk. The dough might be a bit chewier with water compared to soy milk.
- Don’t Waste Extra Tofu Cream – If you have any extra blended tofu cream, store it in an airtight container in the fridge for up to 3 days. You can use it to boost protein and creaminess in smoothies, curries, or pasta sauces.
- Make Them Sweet – To make sweet scones, add 3 tablespoons of sugar (like coconut sugar or white sugar) and 1 teaspoon of cinnamon to the flour. Also, add 1 teaspoon of vanilla extract to the blended tofu.


I cannot wait to make these! anything I can add tofu to, im all about. I read all the comments looking for any yummy variations. also someone on fb said they made a pizza dough out of it! looking forward ti trying that too. love all your recipes. thank you for you time!
Thank you for baking with me here, a pizza dough will be lovely!
made it twice so far, with whole spelt flour, a lot of aluminum free baking powder, salt, and German firm tofu (it’s extremely firm). I made them into only slightly shaped drop buns the second time as the rolling and cutting didn’t work so well with the sticky dough, but they turned out amazing. Definitely a keeper!
That’s sounds so good with spelt, and I am so glad it worked so well!
Made this recipe last night. It was my first time ever cooking or eating scones! They were both delicious and easy to make, especially compared to most pastry recipes. As a busy college student, I love recipes that don’t require 15 steps and 20 ingredients. I can’t wait to make more of your delicious recipes. Thank you for sharing them
Thank you for trying my scone recipe! I am so happy you loved them.
Can I add eggs and almond flour instead?
No, it will be a totally different recipe, and none of the quantities above will stay the same.
Honestly they turned out great! I am curious if they would be good with berries baked in them. Will report back!
how did it go with the berries?
Thank you so much ! I am pretty sure blueberries will taste good in them. I would try adding up to 1/2 cup, not more or they won’t bake as well.
Hi,
The oven needs to be be 200 celsius turbo or regular ?
Thanks
As mentioned in the note called ‘oven mode’, all my recipes are baked on fan-forced mode. I provide the tips to bake on conventional mode too.
These were an absolute HIT!
I ended up having to use 450g of tofu to be able to get 2 1/2 cups but that was an easy fix.
Really amazing that this can be done with tofu. The texture was perfect. I’ll be making these again and again!
Thanks for the lovely review. I am so happy you love them.
can i make them without yeasr just plain flower ‘ and baking soda ‘i wonder they won’t rise ofcourse since i have a diët i can’t eat yeast ‘
maybe have a suggestion?
There’s no yeast in this recipe you you are all good.
hello Carine,
I love scones with my tea and these have been my go-to as they’re fairly easy to make. I’ve used all of your tips and I have made them at least half a dozen times and I even double and triple the recipe and freeze my extras so I can always have them.
My question is the scones have a biscuit texture and not a more dense/stiff texture. I live at an elevation of about 4,700 ft. so I have tried to figure out if that is part of my issue and or I’ve never used self-rising flour, I use what you suggest which is a all-purpose flour and add in the two teaspoons of baking powder. powder. So wondering if you have any suggestions for the texture issue for me.
Thank you so much for sharing this recipe!
Rhonda
Thank you so much for baking my recipes so many times. The classic recipe, made at sea level require 2 cups of flour + 4 teaspoon of baking powder. However, since you are at 4,700 ft. you need to decrease baking powder by about a quarter, so I would use 3 teaspoon baking powder for 2 cups of flour. Then, I would bake at higher temperature, but less long and decrease the liquid a little. That’s the four parameters that you usually should work on when you bake high altitude.
Thank you so much Carine! I appreciate your suggestions and I will follow them in making my next batch.
My pleasure! I look forward to hear back from you.
Hello, I have a question. There is no butter in this recipe. whenever I made scones, butter was an important ingredient and resulted in a very tasty product.
could I add butter here and if so, how much? Thank you.
It’s a healthier scone recipe, you can probably grate 1/3 cup cold butter or plant-based butter and rub in the flavor before adding the remaining ingredients for flavors.